How to start capturing with CloudShot
There are three options to start capturing with CloudShot:
- Press Shot hotkey. By default it's PrtScr button, but you can change it to any other of your choice
- Click on Cloudshot icon in System Tray
- Select "Shot" in CloudShot System Tray menu
All three options above works the same, but capturing with hotkey allows you to shot animated UI elements like tooltips, tray popups and menus:

Screenshot of CloudShot System Tray menu made with CloudShot.
Do we really need to go deeper?..
When you make a shot, whole screen is captured. Thus there's no need to rush - take your time and select the area on the screen you want to share, save or copy. CloudShot detects windows, menus and popups - just point element you need to capture and click it - crop area size and position will automatically match highlighted element.
While selecting the area, you may hold Shift button to keep area square and Space to move area of selection around the screen.
After you have selected the area, you will notice two bars on the sides of crop area:

CloudShot crop area with Editor toolbars
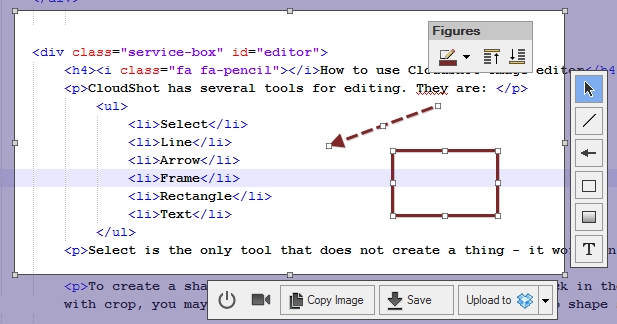
Toolbar on the right has tools for editing the shot. E.g. you can add some text, arrows, lines and other shapes to explain your thoughts. Editing shots is described in the next section.
Bottom toolbar has several buttons for operations with the shot such as:
- Copy image to clipboard. Use this option to quickly add images to your Word document, Powerpoint presentation or email
- Save as file. Use this option if you need to create a file for email attachment or web-page
- Upload menu thas has 4 options: Dropbox, Imgur, FTP and Network drive.
Also you can start record with selected region. To do that, simply press camera icon and follow instructions on the screen. Additonal information about recording can be found
here.
After you are done with editing, just hit upload button: CloudShot will upload your shot to selected storage, and link will be copied to the clipboard. After that you can paste this link to your IM message, email or task manager and share it. Yep, that easy!
How to use CloudShot image editor
CloudShot has several tools for editing. They are:
- Select
- Line
- Arrow
- Frame
- Rectangle
- Ellipse
- Text
Select is the only tool that does not create a thing - it works only for selection. Other tools are used to create different shapes.
To create a shape you need, select corresponding tool, click in the shot area and drag you mouse to set the size of the shape. Same as with crop, you may hold Shift to keep shape square and Space to move shape around.
After you released mouse button, shape automatically gets selected and window with shape properties appears. This window provides options for shape tweaking, such as color, stroke style and text size:

Options for tweaking Rectangle's line
Probably, you have already noticed that - all shapes are independent objects, not just painted strokes. This is really cool feature, because it allows you to tweak shapes after creation. And you can even "transform" one shape to another one with properties change. E.g. Line can be "transformed" to Arrow, if you turn off caps. Frame will become Rectangle if you select transparent fill. Also you can actually transform Frame or Rectangle to Text by pressing Add Text button in properties window. Impressed? Well, we are not surprised - being awesome developers is what we do on daily basis.
In fact, using such shapes is so super cool and convenient that we don't have Undo\Redo system. Yeah, this may sound strange, but we don't feel it's needed, so we decided to save some time and haven't developed it. Please, don't report it as bug or suggestion, we do know about it.
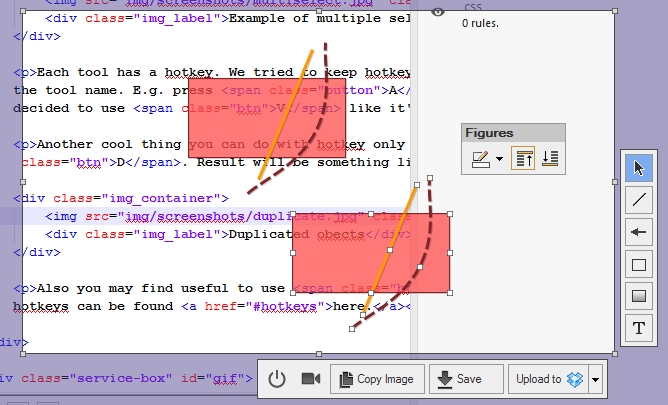
Note that properties window also works fine with multiple shapes selected. Below you can see selected arrow and rectangle, and property window contains only shared parameters. In this case they are line and layering:

Example of shared properties for 2 different shapes
Each tool has a hotkey. We tried to keep hotkeys as simple to remember as possible, thus almost all hotkeys are using first letter of the tool name. E.g. press A to call Arrow Tool. The only tool that doesn't follow this rule is Select - we decided to use V like it's done in Photoshop.
Another cool thing you can do with hotkey only in Duplication: select shape or several shapes hit Ctrl + D. Result will be something like that:

Need several not-default shapes? Use duplication instead of re-creating
Also you can move shapes by pressing arrows. Each press will shift shape on 1 pixel. You may hold arrow keys to speed up movement or hold Shift button. Full list of hotkeys can be found here.